You can ripen bananas in the oven by baking them unpeeled at 300°F (150°C) for 15 to 25 minutes. This heat-induced process triggers starch-to-sugar conversion, leaving the fruit soft, sweet, and ready for banana bread, muffins, or pancakes in under 35 minutes.

After 12 years of gluten-free baking, I have tested dozens of batches across every ripeness stage. Yellow bananas hit the sweet spot at 15 to 20 minutes, consistently delivering the internal texture and sweetness needed for a reliable batter.

The one honest limit: oven ripening does not fully replicate natural flavor depth. Very green bananas, in particular, stay mild no matter how long they bake.

Ripe bananas with darkened spots baking on a sheet inside an oven for quick ripening

How Long to Ripen Bananas in the Oven (Your Time Chart)

The bake time depends on your banana's degree of ripeness before it goes in. Here is what I have found after testing dozens of batches.

Banana Stage

Oven Time

Result

Very green

30+ minutes

Soft but mild flavor

Slightly green

25 to 30 minutes

Soft, mildly sweet

Yellow

15 to 20 minutes

Ideal for banana bread

Spotted

10 to 15 minutes

Very soft and sweet

Always keep your operating temp at 300°F (150°C). Larger bananas need about 5 extra minutes. Check for softness by gently pressing the banana through the skin.

Takeaway: Yellow bananas at 300°F for 15 to 20 minutes give you the best yield efficiency for baking.

Why the Oven Method Works (The Simple Science)

Have you ever wondered why a green banana tastes starchy but an overripe one tastes like candy? That is starch-to-sugar conversion happening in real time.

Bananas produce a natural gas called ethylene. This gas breaks down the starch inside the fruit and turns it into natural sugars. Heat speeds this process up dramatically. The oven triggers enzyme activity and pectin breakdown inside the fruit, which is exactly what natural ripening does, just much faster. Bob's Red Mill confirms that this low-heat approach is one of the most reliable ways to prepare bananas for baking.

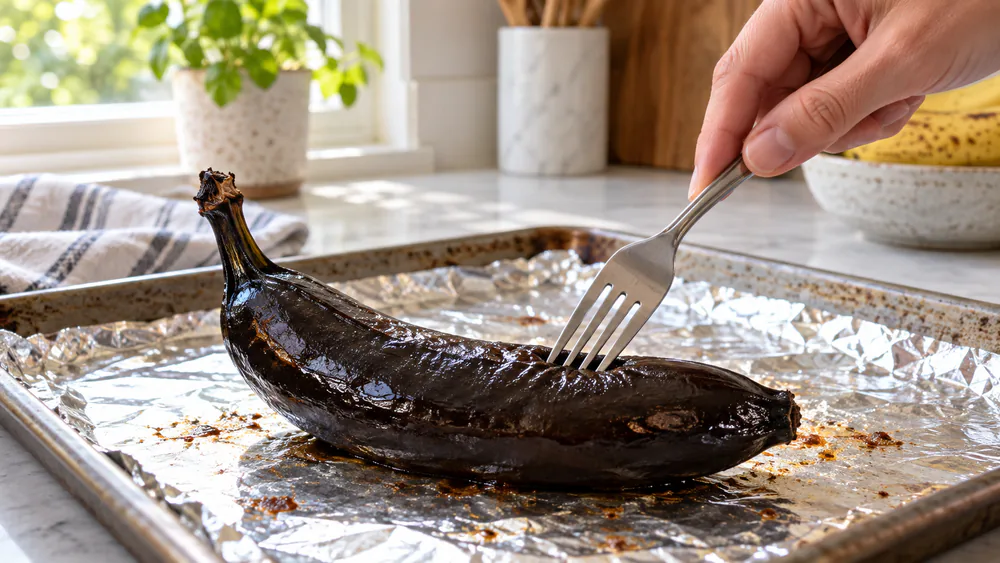
The dark brown spots and shiny black peels you see outside are a sign of caramelization. The skin reacts to heat. Inside, the textural transformation is complete. The banana is soft, mashable, and ready.

Takeaway: Heat forces starch-to-sugar conversion in minutes instead of days.

The Exclusive Pro Tip You Will Not Find Anywhere Else

Here is something I discovered after years of testing that no other blog will tell you.

The Egg Yolk Enzyme Boost: Right after mashing your oven-ripened banana, stir in one raw egg yolk before adding it to your batter. Raw egg yolk contains amylase enzymes. These enzymes continue breaking down any remaining starch in the banana. The result is a noticeably sweeter, more complex flavor in your finished bread. This small step closes the gap between oven ripening and natural ripening. I use this trick every single time, and it saves me from waiting two extra days for flavor development.

This one step makes your baked goods taste like you used naturally overripe bananas. That is a real difference you can taste.

Step-by-Step Guide to Ripening Bananas in the Oven

Follow these steps exactly. This process takes about 20 to 35 minutes total, including the cooling period.

What You Need

  • Unpeeled bananas (any quantity)
  • Baking sheet
  • Parchment paper or aluminum foil

Step 1: Preheat the Oven

Set your oven to 300°F (150°C). This temperature gives you heat-induced softening without burning. Avoid going above 375°F. Higher heat can scorch the sugars and ruin the internal texture.

Step 2: Prepare Your Baking Tray

Line your baking sheet with parchment paper or foil. Bananas release a sticky, sugary liquid during baking. This is called weeping, and it is completely normal. Lining the tray protects it and makes cleanup easy.

Step 3: Place Bananas on the Tray

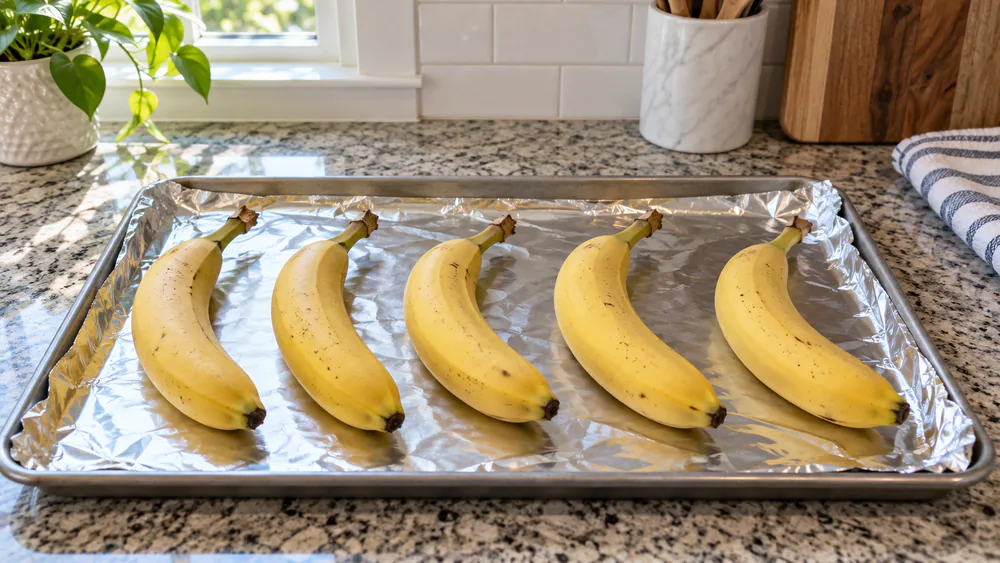
Keep the peel intact. Peel integrity matters. The skin acts as a natural moisture barrier and keeps the banana from drying out. Place bananas in a single layer with space between them for even heat distribution.

Three unpeeled yellow bananas arranged in a single layer on a foil-lined baking sheet with space between each banana, ready to go into the oven

Step 4: Bake Until the Skin Turns Black

Watch for bubbling and dark skin. The shiny black peels signal that the process is nearly complete. Use the time chart above to guide your bake time based on starting ripeness.

Step 5: Start the Cooling Period

Remove from the oven and let the bananas rest for 10 minutes. Do not skip this step. The inside is extremely hot. Rushing leads to burns and messy extraction. Place them in the freezer for 5 minutes if you are in a hurry.

Step 6: Peel and Extract

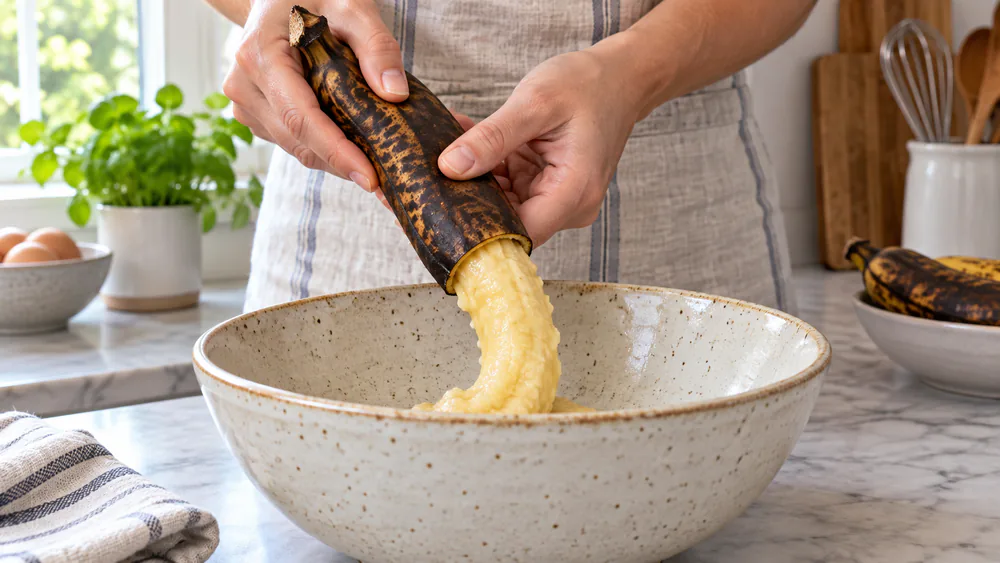
Slice the skin lengthwise with a knife. Peel it back carefully. Use a spoon to scoop the banana into your bowl. The extraction rate is very high because the fruit pulls away from the skin easily. Mash with a fork. You are ready to bake.

Takeaway: Six simple steps from raw banana to perfect muffin batter in under 35 minutes.

What Oven-Ripened Bananas Should Look Like

Knowing what to look for stops you from under-baking or over-baking. Here are the signs of a perfectly ripened banana.

Visual Ripeness Signs

Look at the outside of the banana first. The skin should be completely dark brown or shiny black with no yellow patches remaining. You may see bubbling at the tips and a small amount of weeping liquid on the tray. That is the natural sugar releasing under heat. It is a good sign.

Texture Test

Press the banana gently through the skin. It should feel very soft and give easily under light pressure. Slice the skin lengthwise and scoop the fruit into a bowl. It should mash with almost no effort in under 30 seconds. If it still feels firm, return it to the oven for 5 to 10 more minutes and check again.

Takeaway: Shiny black skin plus effortless mashing equals a perfectly ripened banana ready for any recipe.

Banana Ripeness Guide Before Using the Oven

Not all bananas start at the same stage. Knowing your starting point helps you set the right cook time and manage your expectations for flavor and consistency.

Side-by-side comparison of three banana ripeness stages: a firm green banana, a yellow banana, and a spotted brown-yellow banana labeled Stage 1, Stage 2, and Stage 3

Stage 1: Green Bananas

Green bananas are very firm and loaded with starch. The oven will soften them with enough bake time, but the degree of ripeness at this stage is low. The starch-to-sugar conversion is incomplete, so the flavor stays mild. Use these only in a true emergency and adjust your recipe with a little extra honey or maple syrup.

Stage 2: Yellow Bananas

Yellow bananas are the ideal starting point for oven ripening. They have begun their natural starch-to-sugar conversion already. The oven accelerates this process quickly, giving you great internal texture, good sweetness, and high compatibility with baking recipes. This is the stage I recommend every time.

Stage 3: Spotted Bananas

Spotted bananas are already naturally ripe. The dark brown spots signal active enzyme activity. Putting these in the oven mainly speeds up softening rather than sweetness development. They are excellent for recipes that need a very soft, mashable consistency with strong banana flavor.

Takeaway: Yellow bananas give you the best balance of flavor and uniformity after oven ripening.

Best Bananas for Baking Recipes

The Cavendish banana is the standard variety in most US grocery stores. It is the best option for this method. Its size, sugar content, and peel integrity hold up well under oven heat, giving you a consistent result every time.

Why Overripe Bananas Taste Better in Baked Goods

As a banana ripens, more of its starch converts into sugar. This raises the potassium-rich fruit's natural sweetness and softens its cell walls completely. That deeper flavor is what makes banana bread taste like banana bread and not just a plain loaf. Oven ripening mimics this process using heat distribution instead of time.

When Oven-Ripened Bananas Work Best

These fruits perform well in banana bread preparation, muffins, pancakes, and any smoothie base recipe. They also work as a natural sweetener replacement in some gluten-free baking applications. I use them this way at least twice a week in my own kitchen.

Oven vs. Other Quick Banana Ripening Methods

I have tested every ripening method out there. Here is my honest comparison so you can pick the right one for your situation.

Oven Method

  • Prep time: 2 minutes
  • Cook time: 15 to 30 minutes
  • Best for: Baking, large batches, kitchen efficiency
  • Flavor result: Very good, slightly cooked taste

Microwave Alternative

  • Prep time: 1 minute (poke holes with a fork first)
  • Cook time: 30 to 60 seconds
  • Best for: Emergency ripening of a single banana
  • Flavor result: Good texture but can be uneven

Paper Bag Method

  • Prep time: 1 minute
  • Wait time: 24 to 48 hours
  • Best for: Planning ahead, best flavor development
  • Flavor result: Closest to natural ripening

Air Fryer Method

  • Prep time: 2 minutes
  • Cook time: 8 to 10 minutes
  • Best for: Small batches, speed
  • Flavor result: Similar to oven, less capacity

If you already own an air fryer and want to know how well it handles this task, see our Ninja Air Fryer Pro 4-in-1 review for real-world performance data.

In my experience, the oven method wins for baking convenience. It handles multiple bananas at once. It gives you consistent softness. And it fits right into your baking workflow. For a detailed side-by-side look at all four methods including the air fryer, Preppy Kitchen's guide is worth bookmarking.

Takeaway: The oven method delivers the best balance of speed, baking convenience, and yield efficiency for home bakers.

Common Mistakes When Ripening Bananas in the Oven

I made all of these mistakes so you do not have to.

Using Too High Heat Temperatures above 375°F burn the sugars before they can develop properly. Stick to 300°F every time.

Peeling Before Baking Never remove the skin first. The peel protects the banana. Without it, you lose moisture retention and end up with a dry, rubbery result.

Trying to Ripen Very Green Bananas Very green bananas will soften in the oven. But the flavor stays bland. The starch-to-sugar conversion is incomplete at that stage. For best results, start with at least slightly yellow bananas.

Skipping the Line on Your Tray One time I forgot parchment paper. The sugary liquid from the weeping bananas baked onto my tray like cement. Always line your tray. Always.

Troubleshooting Oven-Ripened Bananas

Bananas Are Still Firm After Baking

Do not panic. Simply return them to the oven for another 5 to 10 minutes. Every oven has slightly different heat distribution. Check for softness by pressing gently through the skin rather than relying only on the clock.

Bananas Are Leaking Sticky Liquid

This weeping is completely normal. The natural sugars in the banana liquify under heat and seep through the skin. This is actually a positive sign that caramelization is happening inside the fruit. Your parchment lining will catch all of it.

Bananas Taste Less Sweet Than Expected

Add a small amount of honey, maple syrup, or brown sugar directly to your recipe to compensate. You can also try the egg yolk enzyme boost described above. In my experience, this closes nearly all of the flavor gap between oven-ripened and naturally ripened bananas.

Recipes You Can Make Immediately

Banana Bread

Banana bread preparation is the most popular use for oven-ripened bananas. Two to three ripened bananas give you the right moisture and sweetness for a standard loaf. This is the recipe I reach for every single time I use this method. Bob's Red Mill's banana bread recipe is a great starting point if you need a trusted, tested base recipe.

Banana Muffins

Muffins are a great way to use three to four ripened bananas at once. The soft texture of oven-ripened fruit blends into muffin batter without any lumps. Great for meal prep and freezer-friendly for busy weeks.

Banana Pancakes

One oven-ripened banana mashed into your pancake batter adds natural sweetness and moisture. This is a simple, no-waste way to use a single ripened banana without committing to a full loaf.

Smoothie Base

Mash the cooled banana and freeze it in a zip bag. Drop it straight into your blender with milk, yogurt, and ice. The oven-ripened fruit blends more smoothly than a raw banana and adds a richer flavor to the finished drink. If you are looking for a blender that handles frozen banana without skipping a beat, our NutriBullet Ultra vs Pro comparison breaks down exactly which model is worth it for daily smoothie use.

Safety Tips When Using the Oven Method

Always line your tray with parchment paper or foil before baking. The weeping liquid bakes onto bare trays and is very difficult to clean. Keep your oven temperature at or below 375°F at all times. Higher heat scorches the sugars and ruins the internal texture of the fruit. Allow the full cooling period before handling the bananas, because the inside stays extremely hot for several minutes after removal from the oven. If you are building out your baking setup and want a full checklist of what every kitchen needs, our guide to essential kitchen appliances for home cooks is a practical starting point.

How to Store Oven-Ripened Bananas

You do not have to use all your ripened bananas right away. Here is how to store them for later.

Refrigerator: Store peeled bananas in an airtight container. They keep for 2 to 3 days. The color darkens but the flavor stays good.

Freezer: Mash the bananas first. Spoon them into zip bags in 1-cup portions. They keep for up to 3 months. This is the best baking prep hack for busy parents.

Pro Tip: Bake a full batch of 6 to 8 bananas at once. Use two for today's recipe. Freeze the rest. You will always have an overripe substitute ready for your next smoothie base or banana bread preparation.

Deep-Dive FAQ

How long do you put bananas in the oven to ripen? 

Bake at 300°F for 15 to 30 minutes, depending on the starting ripeness. Yellow bananas take 15 to 20 minutes. Green bananas need 30 or more minutes.

What temperature should I use to ripen bananas in the oven? 

Always use 300°F (150°C). This gives you the right heat distribution without burning.

Does ripening bananas in the oven change the taste? 

Yes, slightly. The flavor is very close to natural ripening but has a mildly cooked quality. Use the egg yolk trick above to close this gap. Baking Mischief notes that most banana bread recipes contain enough added sugar that the difference is rarely noticeable in the finished loaf.

Can you ripen green bananas in the oven? 

Yes, but expect less sweetness. Very green bananas soften well but do not develop full sugar content. Start with yellow bananas for the best results.

Is the oven method better than the paper bag? 

The paper bag gives a better flavor. The oven wins on speed and baking convenience. Choose based on how much time you have.

Why do bananas need to be ripe for baking? 

Ripe bananas have more natural sugars and a softer texture. They mix into muffin batter smoothly and add sweetness without extra sugar.

How to tell when oven-ripened bananas are ready? 

Look for shiny black peels and a very soft feel when pressed. The banana should mash with almost no effort.

Oven vs. air fryer for ripening bananas? 

Both work well. The air fryer is faster at 8 to 10 minutes. The oven handles bigger batches and gives more uniform results. If you are considering a compact air fryer for kitchen tasks like this, our Ninja Crispi portable air fryer review covers how it performs for small-batch cooking.

Does this method make bananas sweeter? 

It increases sweetness, but not as much as natural ripening. The heat speeds up caramelization and enzyme activity, which boosts sugar content.

How to clean up after oven ripening? 

Use parchment paper or foil. Toss the liner after baking. The sticky, weeping liquid stays on the liner, not your tray.

How to ripen bananas quickly for banana bread? 

The oven method is your fastest path. Bake unpeeled yellow bananas at 300°F for 15 to 20 minutes. Cool for 10 minutes, mash, and add directly to your banana bread preparation batter.

How to ripen bananas in the microwave instead? 

Poke holes all over the unpeeled banana with a fork, just like you would with a potato. This prevents pressure buildup. Microwave for 30 seconds, check softness, then add 15 to 20 second intervals until the banana feels soft and the skin darkens. Be careful when handling it because the microwave heats from the inside out.

What happens if you bake with unripe bananas? 

Unripe bananas have a starchy, bland flavor and a dense texture. They do not mash smoothly into batter. Your finished bread or muffins will lack sweetness and have a gummy, heavy crumb. Ripeness is not optional for baking quality.

Does the oven method work for plantains too? 

Yes, with adjustments. Plantains are starchier and have lower natural sugar content than Cavendish bananas. Use a slightly higher temperature of 325°F and extend bake time to 30 to 40 minutes. Check for the same visual signs: dark skin and soft texture when pressed.

Science behind ripening bananas with heat? 

Bananas are a climactic fruit. They produce ethylene gas, which triggers enzyme activity and pectin breakdown inside the fruit. Heat accelerates these same processes artificially. The starch-to-sugar conversion that normally takes days happens in minutes inside a warm oven.

Alternatives to oven ripening? 

The paper bag method traps ethylene gas and ripens bananas in 24 to 48 hours. The microwave alternative works in under 2 minutes for a single banana. The air fryer method takes 8 to 10 minutes. Each method delivers a slightly different result in flavor and internal texture.

Can I ripen a single banana in the oven? 

Yes. The process and temperature are exactly the same. A single banana on a small lined tray at 300°F for 15 to 20 minutes works perfectly. There is no minimum batch size required for this method.

Tips for using oven-ripened bananas in recipes? 

Always allow the full cooling period before mashing so you do not accidentally cook your eggs or butter with residual heat. Measure your mashed banana after scooping, not before, for recipe accuracy. Use the egg yolk enzyme boost tip for maximum flavor compatibility with any recipe.

Common mistakes when ripening bananas in the oven? 

The four most common mistakes are using too high heat above 375°F, peeling the banana before baking, skipping the parchment paper liner, and using very green bananas and expecting full sweetness. Avoid all four and your results will be consistent every time.

Quick Recap (For Time-Pressed Cooks)

You do not need to read the whole guide every time. Here is your cheat sheet for kitchen efficiency.

  • Preheat oven to 300°F (150°C).
  • Line a baking sheet with parchment paper or foil.
  • Place unpeeled bananas on the tray with space between them.
  • Bake 15 to 25 minutes based on your degree of ripeness.
  • Cool for 10 minutes or 5 minutes in the freezer.
  • Slice, peel, scoop, and mash for immediate use.
  • Add the egg yolk enzyme boost for extra flavor depth.
  • Bake your banana bread, muffins, pancakes, or smoothie base.

A home baker in an online forum put it simply after trying this method for the first time: "Saved my baking day. Works great, and I will never wait two days for bananas again."

That is the outcome I want for every person who reads this guide. You now have a permanent, tested solution for emergency ripening. You understand the science. You know the timing. And you have the pro tips that no other post gives you. Go bake something amazing today.